To address the issue of American Standard AC not cooling, check the thermostat settings, ensure the air filter is clean, and inspect for any visible leaks or blockages. If problems persist, contacting a professional technician for a thorough inspection is recommended.
If you’re struggling with your American Standard AC not cooling, don’t worry! We have some easy troubleshooting tips that you can try yourself to get your cooling back on track. In this article, we’ll guide you through common issues and provide solutions to help you resolve the problem. Whether it’s your AC not turning on, not blowing cold air, or continuously running, we’ve got you covered.
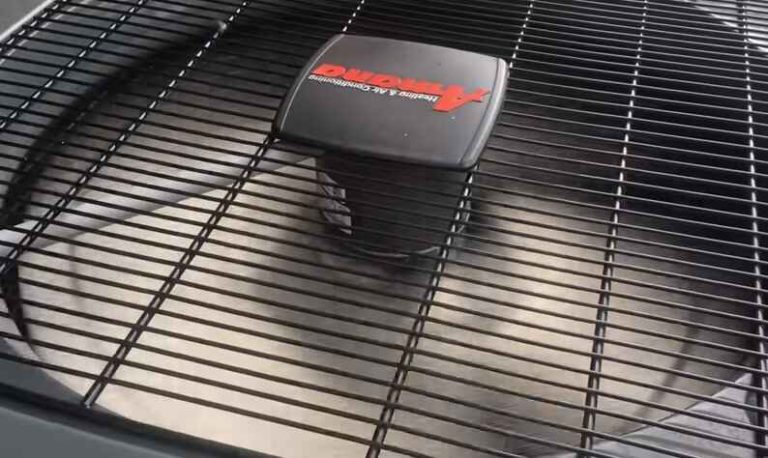
Reasons for American Standard AC Not Cooling
There are several reasons why an American Standard air conditioner may not be cooling properly. Troubleshooting the issue can help you identify the problem and potentially resolve it. Here are some common reasons:
- Thermostat Settings:
- Check the thermostat settings to ensure that the temperature is set to a level where the AC should be cooling.
- Ensure the thermostat is set to “cool” mode.
- Air Filter:
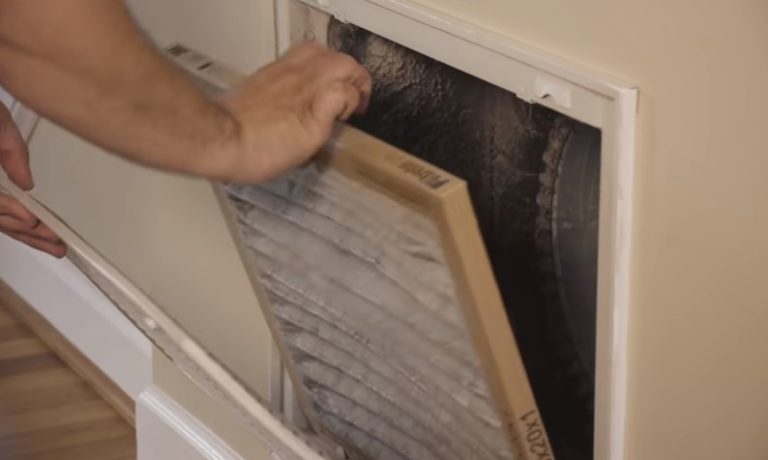
- A dirty or clogged air filter can restrict airflow, reducing the efficiency of the air conditioner. Check and replace the air filter if it’s dirty.
- Refrigerant Issues:
- Low refrigerant levels can lead to poor cooling performance. If you suspect a refrigerant issue, it’s best to call a professional HVAC technician to inspect and recharge the system.
- Dirty Coils:
- Both the evaporator and condenser coils need to be clean for the system to operate efficiently. Dirty coils can reduce heat exchange efficiency. Regular maintenance, including coil cleaning, is essential.
- Faulty Capacitor:
- The capacitor is a component that helps start the compressor and fan motors. If it fails, the motors may not function properly, leading to poor cooling. A technician can test and replace a faulty capacitor.
- Faulty Compressor:
- The compressor is the heart of the air conditioning system. If it’s not working correctly, the cooling capacity of the system is compromised. A malfunctioning compressor often requires professional repair or replacement.
- Electrical Issues:
- Faulty wiring or electrical connections can disrupt the normal operation of the AC system. Check for tripped circuit breakers and loose connections. If you’re not comfortable with electrical work, consult a professional.
- Frozen Evaporator Coil:
- Reduced airflow or low refrigerant levels can cause the evaporator coil to freeze. If you notice ice on the coil, turn off the system and let it thaw before addressing the underlying issue.
- Blocked or Closed Vents:
- Ensure that all vents and registers are open and unobstructed. Blocked vents can restrict airflow and impact the system’s performance.
- System Size:
- If the air conditioner is too small for the space it’s trying to cool, it may struggle to maintain the desired temperature. Conversely, an oversized unit may short cycle and not effectively remove humidity.
If you’re unable to identify or resolve the issue on your own, it’s advisable to contact a qualified HVAC technician for a professional inspection and repair. Regular maintenance and prompt attention to issues can help keep your American Standard AC running efficiently.
AC is not turning on

One common problem homeowners face is when their AC is not turning on. This can be a frustrating experience, especially during hot summer months. There are several potential causes for this issue, including dead batteries in the thermostat or a clogged air filter. In some cases, it may require professional troubleshooting if there is a clogged AC drain line or motor failure.
To resolve the problem, we recommend starting with some simple steps:
- Check the thermostat: Ensure that the batteries in your thermostat are not dead. Sometimes, a simple battery replacement can solve the issue. If the thermostat is digital, check if the display is functioning properly and set at the desired temperature.
- Inspect the air filter: A clogged air filter can prevent the AC from turning on. Remove the air filter and check if it is dirty. If it is, clean or replace it with a new one. This simple maintenance task can help improve the airflow and allow your AC to function properly.
If these measures don’t work, it’s best to contact an HVAC technician to diagnose and fix the issue. They will have the expertise and tools to identify the root cause of the problem and provide appropriate solutions. It’s important to address AC not turning on promptly to restore the cooling comfort in your home.
Having an AC that’s not turning on can be frustrating, but with proper troubleshooting, you can find a solution. Whether it’s a simple fix like changing batteries or a more complex issue that requires professional assistance, don’t hesitate to reach out for help. Stay cool!
AC Not Blowing Cold Air
If you find that your AC is not blowing cold air, there could be several reasons behind it. Don’t worry, we’re here to help you troubleshoot the issue and get your air conditioning system back to blowing chilly air.
The problem of your AC not blowing cold air can be caused by various factors. It could be as simple as incorrect thermostat settings or as complex as a broken AC compressor or leaking refrigerant. Here are some troubleshooting steps you can take to address the issue:
- Check your thermostat settings: Make sure that the temperature setting on your thermostat is set to a cool temperature. Lower the temperature by a few degrees to see if it makes any difference.
- Inspect the outdoor unit: Take a look at the outdoor unit of your AC system. If you notice that it is emitting hot air instead of cold air, there may be a problem with the AC compressor or refrigerant leak. These issues require professional attention, so it’s advisable to contact an HVAC professional to diagnose and fix the problem.
Remember, if the problem persists or if you’re unsure about the cause, it’s always best to consult an HVAC professional. They have the expertise and knowledge to accurately diagnose and resolve issues with your AC system.
Common Causes of AC Not Blowing Cold Air
There are several common causes that could result in your AC not blowing cold air:
| Cause | Potential Solution |
|---|---|
| Incorrect thermostat settings | Check and adjust the temperature setting on your thermostat |
| Broken AC compressor | Contact an HVAC professional to inspect and repair the compressor |
| Leaking refrigerant | Consult an HVAC professional to identify and fix the refrigerant leak |
| Dirty air filters | Replace or clean the air filters regularly to maintain proper airflow |
| Faulty blower motor | An HVAC professional can diagnose and fix a faulty blower motor |
| Blocked or leaking ducts | Check for any obstructions or leaks in the ductwork and have them repaired |
Remember, troubleshooting your AC system can help identify and resolve minor issues. However, complex problems require professional assistance. HVAC professionals have the knowledge and experience to accurately diagnose and repair your AC system, ensuring it blows cold air efficiently.
Troubleshooting American Standard AC Not Cooling
Troubleshooting an American Standard air conditioning (AC) unit that is not cooling involves a systematic approach to identify and address potential issues. Here’s a step-by-step guide to help you troubleshoot the problem:
- Check the Thermostat:
- Ensure that the thermostat is set to the “Cool” mode and the desired temperature.
- Confirm that the batteries in the thermostat are functional and replace them if necessary.
- Inspect the Air Filter:
- A clogged or dirty air filter can restrict airflow and reduce cooling efficiency. Check and replace the air filter if it is dirty.
- Follow the manufacturer’s recommendations for the type and frequency of filter replacement.
- Examine the Air Vents:
- Ensure that all supply and return vents are open and unobstructed.
- Clean the vents and remove any obstacles that may be blocking airflow.
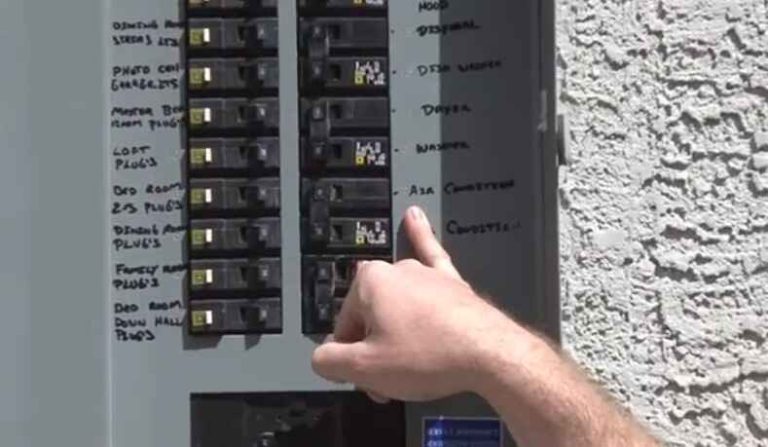
- Check the Circuit Breakers:
- Inspect the circuit breaker box for tripped breakers. Reset any tripped breakers related to the AC unit.
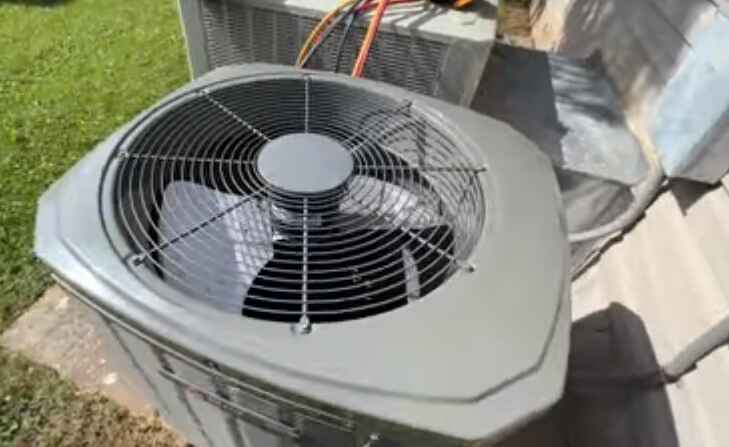
- Inspect the Outdoor Unit:
- Verify that the outdoor unit (condenser) is free of debris such as leaves, dirt, and grass.
- Ensure that the condenser is not blocked by any objects, and there is adequate clearance around it for proper airflow.
- Listen for Unusual Sounds:
- Turn on the AC and listen for any unusual sounds, such as grinding or squealing. Unusual sounds may indicate a problem with the compressor or other components.
- Check the Refrigerant Level:
- Low refrigerant levels can result in reduced cooling capacity. Consult a professional HVAC technician to check and recharge the refrigerant if needed.
- Inspect the Evaporator and Condenser Coils:
- Dirty or frozen coils can impair the efficiency of the AC system. Inspect both the evaporator and condenser coils and clean them if necessary. Consult the user manual for proper cleaning procedures.
- Examine the Ductwork:
- Leaks or blockages in the ductwork can compromise airflow. Inspect the ducts for any visible issues and seal leaks or clear obstructions.
- Check the Fan:
- Verify that the fan on the outdoor unit is running when the AC is turned on. If the fan is not working, it may need repair or replacement.
- Schedule Professional Maintenance:
- If you are unable to identify or resolve the issue, it’s advisable to contact a licensed HVAC technician for a thorough inspection and maintenance.
Always prioritize safety, and if you are uncomfortable performing any of these steps or if the issue persists, it’s recommended to seek professional help from a qualified HVAC technician.

AC is Continuously Running/Won’t Turn Off
If your AC is continuously running and won’t turn off, it can be a frustrating experience. This issue may indicate a faulty thermostat or an improperly sized system. Fortunately, there are steps you can take to troubleshoot and resolve the problem.
To begin with, try checking and troubleshooting your thermostat:
- Change the batteries in your thermostat, as dead batteries can sometimes cause issues with turning the AC off.
- Adjust the temperature settings on your thermostat to see if it makes a difference.
If the AC still won’t turn off after troubleshooting the thermostat, it’s possible that your AC system is not suited for the size of your home. An oversized system may lead to continuous operation as it struggles to reach the desired temperature. In such cases, it’s best to consult with an HVAC professional who can assess your home’s cooling needs and recommend the appropriate system.
Expert Tip:
If you notice that your AC is continuously running, it’s important to address the issue promptly. Continuous operation can strain the system, leading to higher energy consumption and potential wear and tear on components. Seeking professional assistance will help you identify the root cause and ensure proper cooling efficiency in your home.
By troubleshooting your thermostat and seeking professional advice when needed, you can resolve the issue of your AC continuously running and not turning off.
Signs it’s time for a replacement

Sometimes, air conditioner issues indicate that it’s time for a replacement. If your AC is over 20 years old, frequently needs repairs, produces strange noises and smells, or results in high energy bills, it’s likely time to consider replacing your system. An HVAC professional can assess your current AC and advise you on whether repair or replacement is the best option for optimal cooling efficiency.
To determine if it’s time for an AC replacement, here are some key signs to look out for:
- Age: If your AC is over 20 years old, it’s well beyond its expected lifespan. Older units may become less efficient and more prone to breakdowns.
- Frequent Repairs: If you find yourself constantly calling for AC repairs, the cost of these frequent fixes can quickly add up. Investing in a new system can save you money in the long run.
- Noises and Odors: Unusual noises like rattling, banging, or screeching, as well as strange odors, can indicate underlying issues with your AC that may warrant a replacement.
- High Energy Bills: If your energy bills have been consistently increasing despite normal usage, it could mean your AC is no longer running efficiently, leading to higher energy consumption.
When considering an AC replacement, it’s important to consult with an HVAC professional. They can assess your current system’s condition and provide recommendations tailored to your specific cooling needs. They’ll consider factors such as the size of your home, energy efficiency ratings, and budget to help you make an informed decision.
Remember, a new AC system not only ensures optimal cooling performance but can also help reduce energy costs and provide improved indoor comfort. Don’t hesitate to reach out to HVAC experts for their professional guidance.
AC Repair vs. Replacement Comparison
| Factors | AC Repair | AC Replacement |
|---|---|---|
| Age of AC | Repairing an older AC may be less cost-effective due to potential recurring issues. | A new AC can offer improved energy efficiency and reliability. |
| Repair Costs | Repair expenses can add up over time, especially with frequent breakdowns. | Investing in a new system may save money in the long run, reducing repair and maintenance costs. |
| Energy Efficiency | Older AC units tend to be less energy-efficient, resulting in higher energy bills. | New AC systems have advanced technology for better energy efficiency and savings. |
| Comfort and Performance | Repairs may temporarily resolve issues, but older units may struggle to maintain desired indoor comfort levels. | A new AC can provide improved cooling performance and enhanced comfort. |
Help Prevent Air Conditioner Issues
Taking preventive measures is crucial to avoid potential air conditioner problems. By implementing regular AC maintenance practices and ensuring proper troubleshooting, you can keep your cooling system running smoothly and efficiently. Here are some key steps to help you prevent air conditioner issues:
1. Regular AC Maintenance
Regular maintenance is essential to keep your AC in optimal condition. Follow these maintenance steps:
- Change the air filters every 1-3 months to ensure proper airflow and prevent clogging.
- Clean the AC unit’s exterior, removing debris, leaves, and dirt that may obstruct airflow.
- Inspect the AC unit’s fins and straighten any bent fins to maintain proper airflow.
- Check the condensate drain line for clogs and ensure it is clear of any debris.
2. Schedule Professional Maintenance
In addition to regular maintenance, it’s essential to schedule maintenance with an HVAC professional at least twice a year. A professional technician can thoroughly inspect your system, identify any potential issues, and perform necessary repairs or adjustments before they become major problems.
3. Keep the Area Around the AC Clear
Ensure that the area around your AC unit is clear from obstructions such as plants, furniture, or other objects. Blocking the airflow can cause strain on the system and lead to reduced efficiency or overheating.
4. Monitor Performance
Pay attention to any changes in your AC’s performance. If you notice unusual noises, inconsistent cooling, or increased energy consumption, it may indicate a problem. Promptly address these issues by contacting an HVAC professional for a comprehensive inspection and necessary repairs.
5. Educate Yourself
Stay informed about common AC problems and troubleshooting techniques. Knowing how to identify and address minor issues can help you prevent them from escalating into major problems. However, always consult with a professional for complex or potentially hazardous problems.
By following these preventive measures, you can significantly reduce the risk of air conditioner problems and ensure a comfortable indoor environment.
Remember, even with regular maintenance, occasional issues may arise. In such cases, it’s essential to seek professional assistance to diagnose and resolve the problem effectively.
For more information on AC maintenance and troubleshooting, refer to the table below:
| AC Maintenance and Troubleshooting | Benefits |
|---|---|
| Regularly changing air filters | Promotes healthier air quality and improves airflow |
| Cleaning AC unit’s exterior | Prevents debris buildup and ensures efficient operation |
| Scheduling professional maintenance | Detects potential issues early and extends AC lifespan |
| Keeping the area around the AC clear | Optimizes airflow and reduces strain on the system |
| Monitoring performance | Promptly addresses issues to prevent further damage |
| Educating yourself | Empowers you to identify and troubleshoot minor problems |
Thermostat is not turning on

When your thermostat is not turning on, it can disrupt the functioning of your HVAC system. This could be due to dead batteries or problems with the electrical system. Start by changing the batteries and resetting the thermostat. If the issue persists, you may need to consult an HVAC professional to troubleshoot and resolve any underlying electrical issues.
If your thermostat is not responding, it’s important to check the batteries first. Dead batteries can prevent the thermostat from turning on and communicating with your HVAC system. Replace the batteries with new ones and see if that resolves the issue.
If changing the batteries doesn’t help, try resetting the thermostat. Look for a reset button or switch on the thermostat and follow the manufacturer’s instructions to perform a reset. This can sometimes resolve temporary glitches and restore the thermostat’s functionality.
If the thermostat still doesn’t turn on after changing the batteries and resetting it, there may be underlying electrical issues. It’s best to reach out to a professional HVAC technician who can diagnose the problem and provide the necessary repairs. They have the expertise to troubleshoot the electrical components of your thermostat and ensure everything is functioning correctly.
Thermostat is stuck on one temperature

If your thermostat is stuck on one temperature, it can be frustrating to be unable to adjust the temperature in your home. This issue can occur due to various reasons, but there are troubleshooting steps you can take to try and resolve the problem.
- Unlock the thermostat: In some cases, the thermostat may be locked, preventing you from changing the temperature settings. Check the manufacturer’s instructions for your specific thermostat model on how to unlock it. Typically, you can unlock it by pressing and holding specific buttons for a few seconds.
- Change the batteries: If unlocking the thermostat doesn’t solve the problem, the next step is to check and replace the batteries. Faulty or low batteries can cause the thermostat to malfunction. Replace them with fresh batteries and see if the thermostat starts functioning properly.
- Reset the circuit breaker: If changing the batteries doesn’t work, the issue might be related to the electrical supply. Locate the circuit breaker that controls the thermostat and switch it off for a few seconds before turning it back on. This can reset the system and help resolve any temporary electrical glitches.
If these measures don’t work and your thermostat is still stuck on one temperature, it’s best to seek professional assistance from a certified HVAC technician. They have the expertise and specialized tools to diagnose and fix any underlying issues with your thermostat.
Expert Tip:
“Regular maintenance of your thermostat can help prevent issues like it getting stuck on one temperature. Keep the thermostat clean and free from dust and debris, and schedule professional HVAC maintenance to ensure optimal performance.
| Causes of a Stuck Thermostat | Possible Solutions |
|---|---|
| The thermostat is locked | Unlock the thermostat by following the manufacturer’s instructions |
| Faulty or low batteries | Replace the batteries with fresh ones |
| Electrical glitch | Reset the circuit breaker that controls the thermostat |
| Underlying thermostat issues | Seek professional assistance from an HVAC technician |
Home temperature doesn’t match thermostat settings
If you’ve noticed that the temperature in your home doesn’t match the thermostat settings, it’s essential to address the issue to ensure your comfort and energy efficiency. Several factors can contribute to this problem, but there are steps you can take to troubleshoot and resolve it.
Calibrating your thermostat
One possible reason for the disparity between the displayed temperature on your thermostat and the actual temperature in your home is a calibration issue. To calibrate your thermostat:
- Compare the displayed temperature on your thermostat with a separate thermometer placed in a central location within your home.
- If you notice a significant difference, you may need to recalibrate your thermostat to ensure accurate temperature readings.
Note: The process of recalibrating a thermostat may vary depending on the make and model. Consult your thermostat’s user manual for specific instructions on how to calibrate it.
Cleaning the thermostat and changing air filters
In some cases, dirt, dust, or debris can interfere with the functioning of your thermostat, leading to temperature discrepancies. To address this:
- Gently clean the thermostat using a soft cloth to remove any accumulated dirt or dust.
- Inspect and replace the air filters in your HVAC system, as dirty or clogged filters can impede proper airflow and affect temperature control.
Professional evaluation and assistance
If calibrating your thermostat and cleaning the system’s components doesn’t resolve the issue, it’s advisable to seek professional evaluation and assistance. An HVAC technician can inspect your thermostat and HVAC system thoroughly, identifying any underlying problems that may be causing the temperature mismatch. They can provide expert recommendations and perform necessary repairs or replacements to restore optimal performance.
Achieving optimal comfort
Ensuring that the temperature in your home matches the thermostat settings is crucial not only for your comfort but also for energy efficiency. A properly calibrated and maintained thermostat contributes to an efficient HVAC system, reducing energy consumption and saving you money on utility bills.
“A thermostat that accurately reflects the temperature in your home is key to maintaining a comfortable indoor environment and maximizing energy efficiency.”
By addressing temperature discrepancies promptly and following the recommended troubleshooting steps, you can enjoy a consistent and comfortable temperature throughout your home.
| Reasons for temperature disparities | Troubleshooting Steps |
|---|---|
| Thermostat calibration issue | Compare displayed temperature with a separate thermometer and recalibrate the thermostat if necessary. |
| Dirty or malfunctioning thermostat | Clean the thermostat and replace air filters to ensure proper functioning. |
| Underlying HVAC system problems | Seek professional evaluation and assistance to identify and resolve any issues with the HVAC system. |
Remember, maintaining a comfortable temperature in your home is not just about personal comfort but also contributes to energy efficiency and cost savings.
Air Conditioner (AC) Thermostat Not Working
If your AC thermostat is not working, it can be a frustrating experience, especially during hot weather. A malfunctioning thermostat can leave you without cool air when you need it the most. Don’t worry, though – we’re here to help troubleshoot the issue and get your AC back up and running smoothly.
First, let’s check if the thermostat display is lit. An unlit display could indicate power issues. Ensure that the thermostat is getting power by checking the circuit breaker or fuse box. If the display remains unlit, you may need to address the power supply problem or consult an HVAC technician for assistance.
Next, take a closer look at the thermostat itself. Clean any debris or dust that may have accumulated on or around the thermostat. Sometimes, a buildup of dirt or debris can interfere with the thermostat’s functionality.
If the problem persists after checking the power supply and cleaning the thermostat, it’s recommended to contact a professional HVAC technician. They have the expertise to examine the thermostat’s wiring and troubleshoot any mechanical or electrical issues that may be causing the malfunction.
Remember, attempting to repair the thermostat yourself may lead to further complications or potential damage. It’s best to leave the job to the professionals to ensure a safe and accurate resolution to the problem.
Expert Tip:
To prevent future thermostat issues, consider scheduling regular maintenance for your entire HVAC system, including the thermostat. Professional maintenance can help identify any potential problems early on and keep your AC running smoothly.
| Common Causes of AC Thermostat Malfunctions | Possible Solutions |
|---|---|
| The thermostat display is unlit | Check power supply and consult an HVAC technician if necessary |
| Debris or dirt accumulation on the thermostat | Clean the thermostat to ensure optimal functionality |
| Faulty thermostat wiring or mechanical issues | Contact a professional HVAC technician for diagnosis and repair |
Dealing with a malfunctioning AC thermostat can be frustrating, but with the help of a professional HVAC technician, you can get to the bottom of the issue and enjoy a comfortably cool home once again. Remember to schedule regular maintenance for your HVAC system to prevent future problems and ensure optimal performance.
Conclusion
Dealing with an American Standard AC not cooling can be frustrating. However, with these troubleshooting tips, you can try to resolve the issues yourself before seeking professional help. Whether it’s a simple fix like changing batteries or a more complex problem that requires expert assistance, it’s important to address any AC issues promptly to ensure a comfortable indoor environment.
Remember, regular maintenance plays a crucial role in preventing potential problems and optimizing the performance of your AC system. By scheduling regular maintenance with professionals, you can avoid costly repairs and keep your American Standard AC running smoothly year-round. Don’t neglect the importance of regular filter changes, cleaning the system from debris, and having a professional inspection to detect any hidden issues.
So, if you find yourself facing air conditioner troubles, don’t panic. Follow our troubleshooting tips, and if necessary, reach out to a trusted HVAC professional. Stay cool, stay comfortable!

2 Comments